"Mama"

"Mama"
"Mama" by my daughter age 3

Thursday, January 17, 2013

Collage Fishies


3rd graders watched a video of underwater sea creatures. They used their art eyes to observe all the colors, shapes, patterns, and different species that were shown in the ocean. We discussed how fish can have multiple colors. For their project they made their own paper using tissue paper and paper mache glue. They choose 2 or 3 colors for their fish, and added a little bit of tinfoil for some shine. They folded their papers in half and drew half their fish on the fold. Once cut and they opened it up, they had a symmetrical fish. They created the scales by folding their fish in half again, and cut just a little bit. Then they bent out every other fold. They turned out beautiful‼! This has been my favorite project so far this year!
(*Lesson taken from A Faithful Attempt Blog*) 

Visual Movement


4th graders reviewed the art term LINE and learned about VISUAL MOVEMENT in artwork. Visual movement is how your eye moves across an artwork when viewing it. Artists use several elements to create movement: line, shape, and color are some of the main ways and this is what the 4th graders discussed in class. 4th graders created an artwork with lots of visual movement in it. First they created movement by drawing wavy lines on their paper. They second way they created movement was by coloring in each section with a different color. And the last way they created movement was by writing words in the spaces. They wrote our school's expectations, plus two adjectives to describe themselves.

Adaptive Jellyfish


Adaptive students learned all sorts of facts about jellyfish. We also watched a short video to see all the different types of jellyfish there are.
(*idea originated from Relentlessly fun, Deceptively Educational blog)

Winter Trees


First graders made their own paper for their winter trees using tissue paper and paper mache glue. They could use as many colors as they wanted (these are art  winter trees after all;) They then painted a water color background using two colors. Once the papers were dry they cut three tall triangles on their handmade paper. They had to draw It just right to make sure all three triangles fit. They cut and glued the trees on the painted background. They added tree trunks using crinkly brown paper. Lastly, they added glitter gloss to the trees for some winter sparkle, and used paper hole punches to cut snowflakes from silver paper. They did a great job creating an artistic winter wonderland!

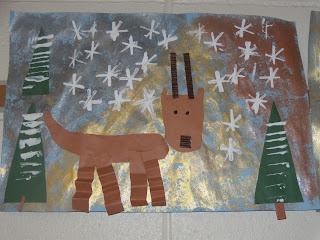
Reindeer


Cute winter project. First graders first sponge painted their background using metallic paints. Next they drew and cut out the head and body of their reindeer from brown paper. I had precut strips for the legs, those were folded with an accordion fold and glued on. Next the antlers and nose were made from corrugated paper. Trees cut, smaller ones glued in the back, larger ones glued in the front. And we used a cardboard strip to stamp the snowflakes and snow on the trees.

Fish Paper Sculpture


I've been doing an underwater unit with most of my classes since returning from winter break. I've been doing so much 3d art with my fifth graders, I though we'd combine 3d and 2d for their first underwater project. I checked out tons of books on fish and sea creatures from our library. I also showed a short video of some amazing underwater footage of all sorts of different sea creatures. I told them to be very observant of the art elements that they are seeing in the fish. Each student was required to draw two fish on their choice of colored construction paper. They needed to draw lots of details, but keep the coloring to a minimum since we were using colored construction paper. Once their fish were drawn and colored, they created the paper waves from two shades of blue and attached the fish with some glue and staple here and there to secure it for good measure.

(*The idea for this started on a photograph I saw on Mr. E's art blog*)

Metal Tiki Masks


5th graders learned about the history of Polynesian masks through a Power Point Presentation. Tiki statues have been around for hundreds of years. They have their roots in Polynesian culture. They are most prominently found in the Pacific Islands, New Zealand, Hawaii and the most famous Tikis tower over Easter Island.
Tikis usually featured a human head carved from wood or volcanic rock. The large cylindrical shape of the trees formed their basic shape. All of the features are exaggerated especially the nose and mouth. Most ancient Tikis have little painted decoration.

Fifth graders created their Tikis by doing a drawing  for Square 1 Art. Students then traced their design to onto metal tool and used the repousse technique of pressing out the metal on one side to create a popping out effect. They then colored in parts of mask with Sharpie and decorated with feathers and beads. Lastly they fastened them to wooden stands.

Symmetrical Nutcracker Drawing


5th graders watched a short video of a woodworker creating a nutcracker from hand tools in a time lapse video. We have been discussing symmetry for the last few projects, so this was somewhat of review for them. I had a hand out with several different nutcracker images for them to reference for their drawing ideas. They folded their manilla paper in half, and were only required to draw half of the nutcracker. Once they were done, they needed to darken the pencil lines, fold their paper in half the other way, and then roll over their drawing with a roller/brayer. The other half of their nutcracker then showed up ever so lightly on the other side. They then traced the drawing in Sharpie and painted in with tempera cakes.

(*Lesson taken from A Faithful Attempt Blog*)