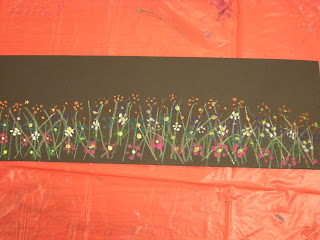
"Mama"

"Mama" by my daughter age 3
Tuesday, May 17, 2011
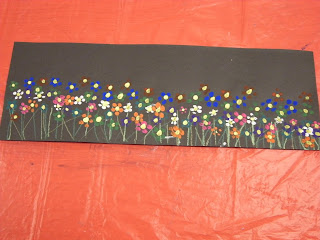
Flower Meadows
This was an easy end of the year painting project for first graders. It has taken spring so long to come to Wisconsin, that we though we'd move it along in art class by painting spring flowers. We read the story REALLY SPRING. (a great older story about a town that is so sick of winter that they start painting spring things all over the town). We reviewed vertical and diagonal lines and used small brushes to paint the flower petals.
Mini Monets
This was an easy one day painting project that I did with 5th grade when I returned from maternity leave. We learned about Monet through a Power Point presentation that I had made. We discussed the painting style of Impressionism. I find that students get a kick out of painting like an Impressionism because it is such a loose style of painting. Each student needed to re-create the Lily Pond paintings. I showed them how to paint wet on wet with tempera paint and to do the color mixing right on the paper. Some worked really quick, so I had them do a second one and we turned those into a Lily Pond collage.
Butterflies
2nd graders at one of my schools were actually growing butterflies in their classrooms for their science classes. So what a great tie in to do butterflies in art. We discussed symmetry and what it is in art and nature. Students cut out their butterfly shapes by folding a piece of paper in half and cutting on the fold to get the same shape for both wings. When we applied paint, we only did to one side, then we folded the butterfly back together and smooshed the paint around. When they opened up their wings they had a beautifully colored butterfly that was symmetrical in color and shape.
For the background we used tissue paper that bleeds and water. I just learned about this technique this year and love it. Just put tissue paper on your white paper and add water. Let the tissue paper dry, and then it peals right off. I was able to keep reusing the same tissue paper for all my classes.
Day Of the Dead Skeletons
I did this lesson in the fall. In my district we have a large population of hispanic students and they always get excited when we do lessons that include a tradition from their culture. I even had a student who had participated in a Day of the Dead celebration in Mexico a couple of years ago. It was awesome to hear her first hand account of what she saw and did to celebrate this holiday. We discussed the tradition of the holiday and what the skeletons and marigold flowers represent. There are some good videos on You Tube that show people celebrating this holiday in the traditional manner in Mexico, as well as locally here in America.
Around Halloween time you can get cheap plastic skeletons at the Dollar Store. I loaded up this year on mini skeletons so each of my art tables could have two or three to look at. I had also printed out a few pictures of Day of the Dead skeleton drawings from the internet for students to reference as well.
Chuck Close Self Portraits
5th graders learned about the artist Chuck Close through the DVD Up Close with Chuck Close. I had to fast forward through some parts, but it's a great video that shows how he works in his studio and how he had to overcome his disability to continue painting. I photographed each student and printed out a 4x6 photocopy of their portrait. Cut 18x24 paper down to 16x24 to get the same ratio size of the photograph. I had pre-cut strips of tagboard to use for when the students had to grid their photographs and drawing paper. 1 inch strips for the photo, and 3 in for the drawing paper. This is a great lesson to help improve drawing skills. They need to really look at each box individually and draw only what they see. I kept telling them that once they give in to this process of drawing, they will have great results. And we did!
Klimt Tree of Life
2nd graders learned about the artist Gustav Klimt. We read the story Klimt's Cat and looked at examples of his artworks. We talked about common things that we saw in Klimt's artwork: the use of the color gold, shapes, and patterns. We painted the background gold first. Then 2nd graders painted trees free form (no drawing first). Lastly, we added oil pastel and sequence details to the trees.
Paper Mosaics
Third graders learned about how to make Mosaics. We used only the scrap box for this project, which is great for the end of the year. I had the students do a pencil sketch of their landscape design first, and then add the little paper pieces. It was a great review of how to glue properly too.
Saturday, May 14, 2011
Koinobori Wind Socks
May 5th is Children's Day in Japan. On this day, families raise the carp-shaped koinobori flags (carp because of the Chinese legend that a carp that swims upstream becomes a dragon, and the way the flags blow in the wind looks like they are swimming), one for each child.We also talked about symmetry when making the drawing. Fold a piece of brown craft paper in half ( our sheets were about 3 ft long). Have the students draw the carp shape, but make sure the fin is opposite of the fold. Cut it out. Open it up and draw the other half of the carp as symmetrical as possible. Color in with oil pastels. Paper punch a hole in the center of the mouth. Losely twist 2 pipe cleaners togethe and tacky glue along the mouth. Glue the rest of the fish together, but keep the mouth open by bending the pipe cleaners. String yarn through the holes and attach to a stick.
The Grouchy Lady Bug
First grade read The Grouchy Lady Bug by Eric Carle. We also talked about the art technique collage. The students used tissue paper and paper mache glue to make green and red paper the first class. The second class they cut and glued shapes to make their lady bug. I think their favorite part was making the angry eye brows and the frown. They also added little baby lady bugs with the left over red paper.
Mardi Gras Masks
I know it's way past Mardi Gras, but I had planned on doing this lesson with my students when we returned from Christmas break in January, but I had my baby a month early and didn't go back until April. I let my 5th graders choose one of their last projects of the year- with a few suggestions of course. And this is what they picked. They turned out so cool. I'm going to give them a little more time to finish decorating. The masks are one layer of thin craft paper and two layers of tissue paper. I also added a little glitter gloss to the paper mache glue to make it sparkly.
Adaptive Circle Paintings
This project is great for any little artist no matter what the skill level. My adaptive students loved this day in art. Each was given a sheet of paper that was the length of the table (I only have 5 students in my adaptive class). I had a whole table filled with cups of different colored paint. The only direction I gave them was to only paint circles to start. Every 3-4 minutes I'd give them a new color. The last step I gave them was to use water color to fill in any of their white spots. They were so engaged! And it was so cool to see their personality shine through in the paintings: one student painted all his circles in solidly, one painted them all the exact same size, and of course there was one who was all over the place. It was amazing to watch!
Friday, May 13, 2011
Adaptive Fish Pond
When I do my adaptive lessons I like to do projects that incorporate layers. This way the projects last a couple of classes, and it always makes the artwork look better when we keep adding more details to it. On Day one we used paper mache glue and tissue paper to cover an 18x24 sheet of paper. I had cut out stencils of Koi Fish for my students to use. They used chalk pastels to color in the stencil shapes. Lastly I hot glued some google eyes on the fish.
Chihuly Tower
5th graders studied Chihuly too. I know these Towers are all over art blogs now, but they are so cool. It was nice to have my two fifth grade sections work together to make this sculpture. It took us almost a month to complete working on it here and there between other projects. I found it to be a great stress relief for my special friends from other classes too when they needed a break from their work or a distraction for awhile. It really brightens up the entry way to our school:)
Dale Chihuly Flowers
4th graders learned about the ancient art of glass blowing through some YouTube videos that I had seen on other art blogs. I also showed a Power Point that my friend at Artolazzi had made for her kiddos when she did a Chihuly unit. The students created Macchia Flowers using coffee filters, markers, liquid starch, they paper mached the stem of the flowers with tissue paper. The last step was to splatter paint because Macchia means spotted in Italian.
Subscribe to:
Posts (Atom)


